



12 DIY Duck Coop Ideas: Drainage, Ventilation, and Predator Safety
The single most common duck housing mistake is building a chicken coop and putting ducks in it.
Planning the right footprint first prevents crowding and moisture problems. Use our free chicken and duck coop size calculator to estimate indoor shelter, outdoor run area, and floor-level nesting spaces for your ducks.
It seems reasonable — both are poultry, both need shelter, both need protection from predators. And many chicken coop features do transfer well to duck housing. But the specific differences between what chickens need and what ducks need in their housing are meaningful enough that a chicken coop applied directly to ducks produces consistent, predictable problems.
Free Backyard Flock Checklist
Planning the rest of your flock setup?
Turn your coop-size estimate into a complete setup plan with our free equipment and preparation checklist.
Duck housing must manage moisture, simplify cleaning, and remain secure in local weather. For maintenance planning, use our duck-coop cleaning routine.
These twelve DIY duck coop ideas are designed around what ducks specifically need — the drainage, the ventilation, the ground-level access, the absence of roost bars, and the moisture management that distinguishes excellent duck housing from repurposed chicken housing. Each concept can be adapted to solve a particular housing problem, but dimensions, foundations, drainage, snow and wind loads, electrical work, and permit requirements must be checked for the site.
The Duck Coop Differences You Must Design For
Before the ideas — the design requirements that separate a duck coop from a chicken coop, and that must be incorporated into any of the twelve ideas below:
No roost bars: Ducks are not just feathered chickens. Their housing needs are a bit different. A well-designed duck house should have space — ducks need room to roam, with enough unobstructed floor area for every bird to rest without crowding; many backyard plans begin around 4 square feet per standard-size duck, then increase space for large breeds, indoor feeding, or long periods of confinement — security, a dry area, and easy access. Ducks sleep on the ground in bedding, not on elevated perches. A duck coop interior designed with roost bars wastes space and creates obstacles that ducks navigate around rather than use.
Higher ventilation than a chicken coop: Ducks produce significantly more moisture than equivalent numbers of chickens through their water use, their respiration, and their liquid-heavy waste. A duck coop requires more aggressive ventilation than a chicken coop of equivalent size.
Drainage priority: The moisture that ducks bring in on their bills and feathers from their pool and waterer, combined with their liquid waste, makes drainage the most important structural consideration in duck coop design. A duck coop without a drainage plan becomes saturated bedding within days.
Ground-level nesting: Most domestic ducks prefer floor-level or very low nesting spaces. Avoid high boxes and steep access, while recognizing that individuals may choose their own sheltered corner.
Ramp considerations: Any elevated entrance requires a gradual, wide ramp with horizontal grip strips — ducks’ webbed feet make steep or narrow ramps difficult to navigate, and ducks who fall from ramps can sustain injuries.
Idea 1: The Classic A-Frame Duck House
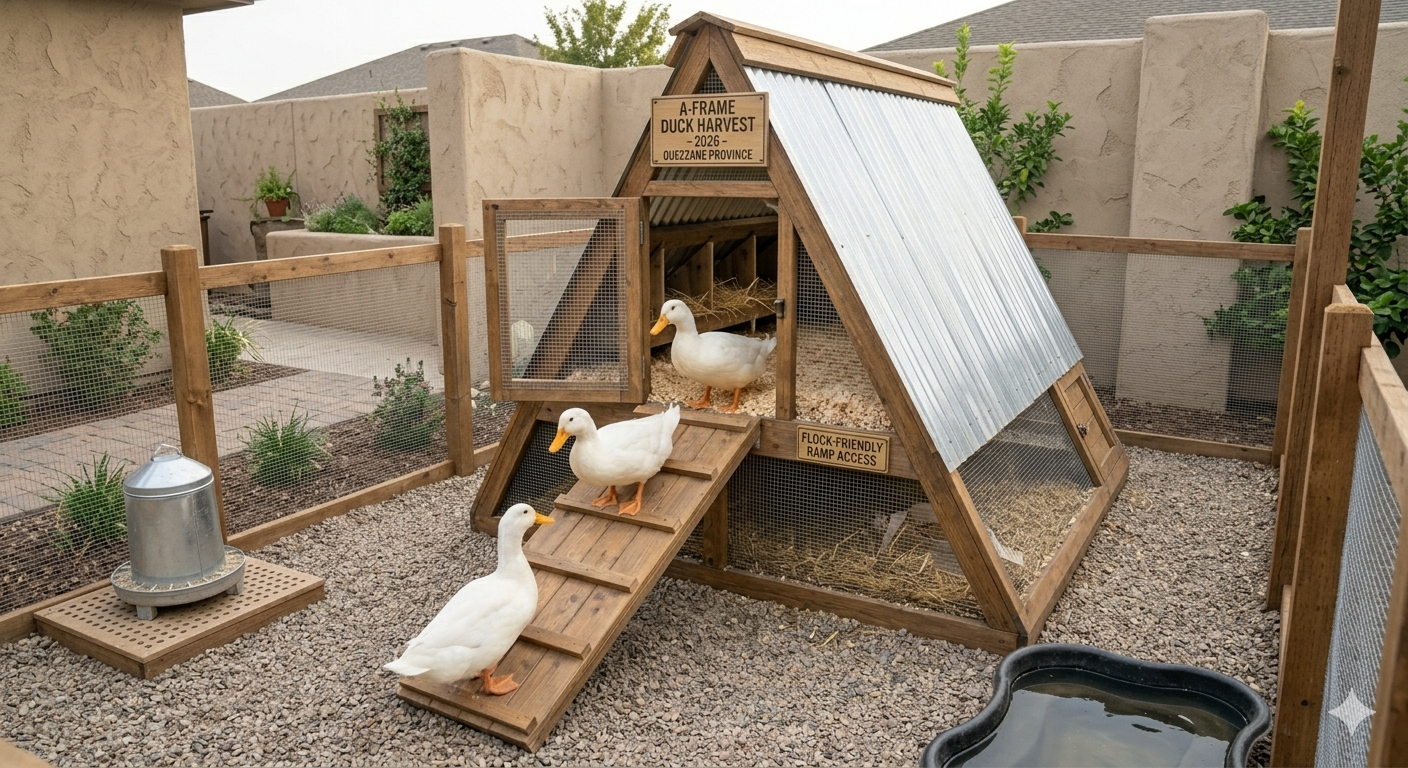
An A-frame design is super simple. It can be built with scraps and old furniture, such as a pallet, plywood, and corrugated asphalt roofing panels. To make it a tractor, add four wheels. Many keepers install a flip-up door to access eggs and bedding when needed.
An A-frame uses relatively simple geometry and its steep roof sheds precipitation well. Build time and mobility depend on materials, bracing, local wind or snow loads, and the strength of the person moving it.
An A-frame can be approachable for a capable beginner, but safe framing, fastening, ventilation, predator resistance, and weather loads still require careful planning. The steep sides of the A-frame drain rain immediately, and the structure can be built light enough to be moved periodically, giving the flock access to fresh ground.
Build dimensions: A 4-by-6-foot base may suit a small flock used only for overnight shelter, but capacity depends on breed size, ventilation, climate, and how long birds remain indoors. Make any ramp broad, gently sloped, non-slip, and easy to test rather than relying on one universal cleat spacing.
The key duck modification: Ventilation openings at both ends of the A-frame, covered with hardware cloth, provide the cross-ventilation that a duck coop requires. An A-frame without end ventilation traps moisture despite the open design.
Idea 2: The Raised Platform Duck House
Build the structure 2 to 3 feet off the ground using sturdy posts or concrete blocks for support. The elevation naturally improves drainage and prevents flooding during heavy rains that typically plague ground-level coops.
A raised house separates the floor from ground moisture and can provide covered outdoor space. Elevation alone does not keep the interior dry: roof leaks, tracked water, droppings, ventilation, and bedding management still matter.
Avoid improvised heating mats beneath combustible flooring or bedding. Healthy, fully feathered adult ducks usually benefit more from dry bedding, draft protection at bird level, and high ventilation than from supplemental heat. If heat is medically or climatically necessary, use equipment specifically rated for livestock spaces and have the electrical installation checked for fire and moisture safety.
The ramp for a raised duck house requires careful attention: wider than a chicken coop ramp (wide enough for your largest duck breeds to turn safely), gently angled, with a non-slip surface and side protection where a fall is possible. Ducks negotiate gradual ramps confidently; steep ramps produce falls and resistance.
Best for: Wet climates. Flood-prone areas. Keepers who have found ground-level coops consistently saturated.
Idea 3: The Converted Shed — Maximum Space, Minimum Build Time
A well-designed duck house should have plenty of windows to brighten their day. Ducks enjoy natural light.
We put a permanently open vent window at the very top of the tall side — this will never be covered to ensure air is constantly moving.
An unused garden shed — converted to duck housing through ventilation additions, hardware cloth on all openings, a drainage slope added to the floor, and ground-level nesting areas installed along one wall — becomes the most space-efficient duck housing available for a medium to large flock.
The key modifications for a shed-to-duck-house conversion:
Ventilation: Add ventilation openings near the roofline — both sides if possible, for cross-ventilation. These should be covered with hardware cloth and positioned so they remain open year-round.
Drainage: Before altering a floor or adding a drain, check structural capacity, frost movement, local building rules, and where wastewater is allowed to go. A removable, washable floor surface and water station outside the sleeping area may be simpler than an indoor drain.
Nesting areas: Install low-sided wooden boxes or plastic containers along one wall — filled with straw or pine shavings and positioned at floor level.
Security: Hardware cloth over all windows and ventilation openings. Predator-proof latches on all doors.
Idea 4: The Duck House with Integrated Drainage System
A lot of sweat went into this duck house. My main concern was to avoid mold, mildew, difficulty cleaning poop, and to avoid it falling apart in two summers.
The drainage system is the feature that separates a duck house that is manageable year-round from one that becomes a moisture disaster within the first wet season. The most effective integrated drainage approach:
Where permitted, a professionally planned floor can slope gently toward a serviceable collection or drainage point. Do not leave a predator-access gap, direct dirty water into streams or neighboring property, or pour a concrete overlay without confirming that the structure can support it.
Outside the drain point, a gravel channel or French drain carries the exiting moisture away from the coop foundation rather than allowing it to pool against the base.
The maintenance benefit: A coop with integrated drainage can be cleaned by removing bedding and hosing the floor — the water exits through the drain rather than accumulating. This can shorten cleaning time and make more frequent full cleanings practical, which produce consistently better hygiene conditions than infrequent cleanings of any bedding depth.
Idea 5: The Predator Fort Duck Coop
The duck coop that is designed around maximum predator security — for keepers who have lost birds and are determined to prevent future losses:
Use small-gauge welded hardware cloth on ventilation openings and vulnerable run surfaces. For ground protection, a well-secured outward apron or buried barrier is usually preferable to exposed wire flooring, which can injure feet. Inspect every seam, door edge, and penetration for gaps appropriate to the predators in your area.
Security. Ducks are quite flighty when it comes to predators. Make sure your coop can withstand everything from raccoons to neighborhood cats.
An apron of hardware cloth extending 12 inches horizontally outward from the base of the run fence — buried or staked flat on the surface with heavy rocks — prevents digging predators from reaching the coop wall through direct excavation.
An automatic door can support a consistent lock-up routine, but it is not fail-safe. Confirm every evening that all birds are inside, the track is clear, the door latched, and no predator entered before closure. Keep a manual backup for power, battery, ice, and sensor failures.
Two-step latches on every door — a sliding bolt plus a carabiner or padlock. Raccoons can open single-step latches that are not specifically raccoon-proof.
For keepers with aerial predator pressure: A securely covered run with suitable welded wire or hardware cloth reduces exposure to hawks and owls, which is the threat vector most often underestimated by new keepers.
Idea 6: The Cob Duck House — Natural Building Approach
You can build a snug duck house from cob — that’s clay, sand, and straw — that holds in heat during winter and stays cool in summer. Cob walls soak up and release heat, so the inside doesn’t swing wildly in temperature. The material breathes, which helps keep things dry and mold-free if you pair it with a good roof and floor. Cob is cheap, eco-friendly, and shapes into cozy, round coops if you’re feeling creative. Just make sure you raise the base and let the roof hang over to keep mud off the walls.
Cob can reduce reliance on manufactured wall materials, but a safe build still needs a durable foundation, weatherproof roof, predator-resistant openings, ventilation, and often code-compliant reinforcement. Thermal mass moderates temperature changes; it does not provide the same insulation as a high-R-value wall or guarantee a dry interior.
The practical requirement: the cob base must be raised above ground level, and the roof overhang must be sufficient to protect the walls from rain erosion. Without a raised, moisture-resistant base and generous roof protection, cob can erode. Longevity depends on soil mix, detailing, rainfall, freeze-thaw cycles, maintenance, and local construction practice.
Best for: Keepers with access to appropriate subsoil. Off-grid or low-input homestead setups. Aesthetic preference for natural building materials.
Idea 7: The Duck Tractor — Fresh Ground Every Week
To make it a tractor, add four wheels. You can easily pull or move a small house. Many keepers install a flip-up door to access eggs and bedding when needed.
The duck tractor — a mobile coop on wheels that can be moved across the property periodically — provides the most productive integration of ducks into a garden or homestead system. As the coop moves, the flock fertilizes and pest-controls each successive area of ground, and the previously occupied area recovers.
The design challenge is balancing structural strength and predator resistance with safe mobility. Size the sleeping area to the actual birds and climate rather than assuming a 4-by-4-foot structure suits four to six ducks. Large wheels, balanced handles, or a compatible tow system may reduce lifting strain.
The predator consideration: A mobile coop on wheels is less structurally secure than a fixed coop on a concrete foundation. The hardware cloth quality and latch security requirements are even higher for a mobile structure that may flex during transport.
Idea 8: The Floating Duck House
A floating shelter can provide shade or a daytime resting platform on a managed pond, but it should not be presented as automatically secure nighttime housing. Raccoons, mink, otters, snakes, and other predators may swim, while storms, entanglement, unstable flotation, ice, and difficult keeper access add hazards.
Treat this as a specialized daytime feature, not a beginner build. A naval architect, experienced pond contractor, or qualified builder should assess flotation, anchoring, load, materials, water-level change, and emergency retrieval.
Water is not a reliable predator barrier. Ducks should still be locked at night in a dry, land-based structure that the keeper can inspect and secure.
The practical challenges: anchoring the structure to prevent excessive movement in wind or current, maintaining access for the keeper (an adjacent dock or reaching pole for egg collection), and ensuring the floating platform is stable enough in typical conditions that the structure is not constantly moving.
Best for: Managed ponds where a qualified build and daily inspection are realistic; use only as a supplemental platform unless local professionals establish a safe design.
Idea 9: The Repurposed Kids’ Playhouse — The Surprise Champion
One of the most consistently recommended duck housing solutions in experienced keeper communities: a secondhand children’s wooden playhouse — available frequently on resale platforms — converted to duck housing with ventilation additions, hardware cloth on all openings, and a floor drainage system.
The playhouse provides: substantial covered space at low cost, multiple access doors that facilitate cleaning, windows that can be converted to ventilation, and a height that allows the keeper to enter comfortably rather than crouching through a low access door.
The necessary conversions: all window openings covered with hardware cloth; all floor-to-wall junctions sealed against predator entry; ventilation added near the roofline; a drainage slope created in the floor; nesting areas installed at ground level.
Best for: Keepers who want significant covered space at minimal cost. Frequently available for free or at very low cost on local resale platforms.
Idea 10: The Mini Barn — The Aesthetic Champion
Think about the traditional duck barn aesthetic or go for something more modern. A rectangular shape works best, with a raised floor to prevent flooding. A sloped metal roof will allow rain to run off and keep the space dry.
A mini barn can combine a polished backyard appearance with useful standing height, roof volume, and accessible cleaning space when it is properly built.
A rectangular footprint with a gambrel roof can provide useful interior volume and good rain shedding, although it is more complex to frame and flash than a simple shed roof.
Interior layout for a mini barn duck house: The door (large enough for the keeper to enter standing) on one end. Nesting areas along one long wall. Ventilation openings on both gable ends are covered with hardware cloth. The pop door for duck access on the opposite end from the main keeper door, with a gradual ramp.
Idea 11: The Three-Sided Shelter — Open Front, Protected Back
For keepers in mild climates or who have covered, predator-proof runs attached to a smaller coop: a three-sided shelter — solid roof, solid back wall, solid side walls, open front — that allows maximum natural ventilation while providing rain and wind protection from the prevailing weather direction.
The three-sided shelter works best when: the surrounding run is securely covered and built to resist local predators (the open front requires that the surrounding structure provide the security), the climate does not produce extreme cold (the lack of a front wall means no insulation benefit), and the prevailing weather comes from the direction the solid walls face.
The great advantage: Maximum natural ventilation with zero active management. An open front improves air exchange, but orientation, wind-driven rain, litter moisture, and stocking density still require monitoring.
Idea 12: The Duck Palace — Building for the Long Term
The duck keeper who has kept ducks for several years, expanded their flock, and wants a permanent, high-quality structure that will serve the flock for a decade without significant maintenance:
A purpose-built structure on a concrete pad (the most permanent and most cleanable floor option). Full standing height for the keeper. Ventilation integrated into the design — ridge vent, wall vents, operable windows. Permanent drainage slope built into the concrete pour. External egg collection door built into one wall. Space and protected wiring for an optional automatic door can be planned from the beginning rather than retrofitted. Hardware cloth on every opening, built into the framing rather than stapled to the surface.
A well-built permanent structure can reduce maintenance and simplify cleaning, but no coop is maintenance-free. Compare lifetime cost, drainage access, materials, permits, and the possibility that flock size will change.
Choosing a Design:
Twelve ideas. One fundamental principle running through all of them: the duck coop that works is designed for what ducks actually need — moisture management, ground-level access, generous ventilation, and security that does not rely on the keeper being home at exactly the right time every evening.
Your design should look less like a Tetris game gone wrong and more like a cozy abode for your waddling pals.
Build for the flock you will have in two years, not the one you have today. Build the drainage in before the ducks arrive. Use predator-resistant materials where needed, test every latch and seam, and treat an automatic door as one layer rather than the whole security plan.
Before building, sketch the flock’s sleeping area, ventilation, water location, cleaning route, drainage destination, and predator barriers. Check local rules and have structural or electrical details reviewed when the project goes beyond a simple shelter.
Sources and further reading
- Cornell Duck Research Laboratory: Duck housing and management
- Utah State University Extension: Predator-resistant poultry enclosures
Continue Exploring Your Backyard Flock
Use these closely related guides to plan your next steps:

9 thoughts on “12 DIY Duck Coop Ideas: Drainage, Ventilation, and Predator Safety”
Comments are closed.